Quick Photography Tips
The following are some really simple photography tips and techniques for digital camera users. Some are photography tips for beginners, but some may serve as a reminders to those photographers who may have been taking pictures for a while. These are "quick photography tips" but check the Photography Tutorials or use any applicable link to get more detailed information about that particular subject.
Keep a camera with you. You never know when an opportunity to take a picture will come up. You don't need to carry a bulky Digital SLR camera around with you. Just take a pocket sized compact digital camera with you even when you aren't planning to take pictures.
Also, don't forget that you probably always have a camera in your pocket or purse! Yep, that would be your cell phone camera. Many top of the line camera phones can produce images that are similar in quality to some basic compact camera images.
So always keep some sort of camera with you. You might be surprised how many photography subjects you might notice just because you have a camera with you.

Photography Tip Picture #1
|
Use the camera's white balance feature to warm an image: Using your camera's automatic white balance setting will usually reproduce the color tones in a scene pretty accurately. However, changing the camera's white balance setting can change the color tone in an image.
For instance, Picture #1 was taken on a sunny day and the white balance setting used was "daylight". Picture #2 was taken using the white balance setting of "shade". Notice how the picture has an overall warmer tone. |

Photography Tip Picture #2
|
In reality that color tone of picture #1 much closer to the actual look of the building than the tone shown in picture #2.
However, in some situations a warmer tone might be more appealing to the individual photographer. The bottom line is that it boils down to a matter of personal preference.
Changing the white balance setting to "shade" on a sunny day also works well to eliminate bluish tints from bright white subjects like snow taken on a sunny day. Check the tutorial, White Balance for more on this subject
Try Taking Pictures From Different Perspectives (Views) Many amateur photographers can get bored and think there is nothing interesting to take pictures of around them. A challenge you might want to try is to make something out of what might seem to be a "nothing" scene or subject.
Try a picture frame by Nixplay
One way to possibly make shots of boring subjects interesting is to try different perspectives. That might require shooting from different angles. Or it may involve getting closer to, or further away from your subject. Don't forget you can also zoom in or out to include or exclude more or less of the scene around the primary subject.

Photography Tip Image #3
|
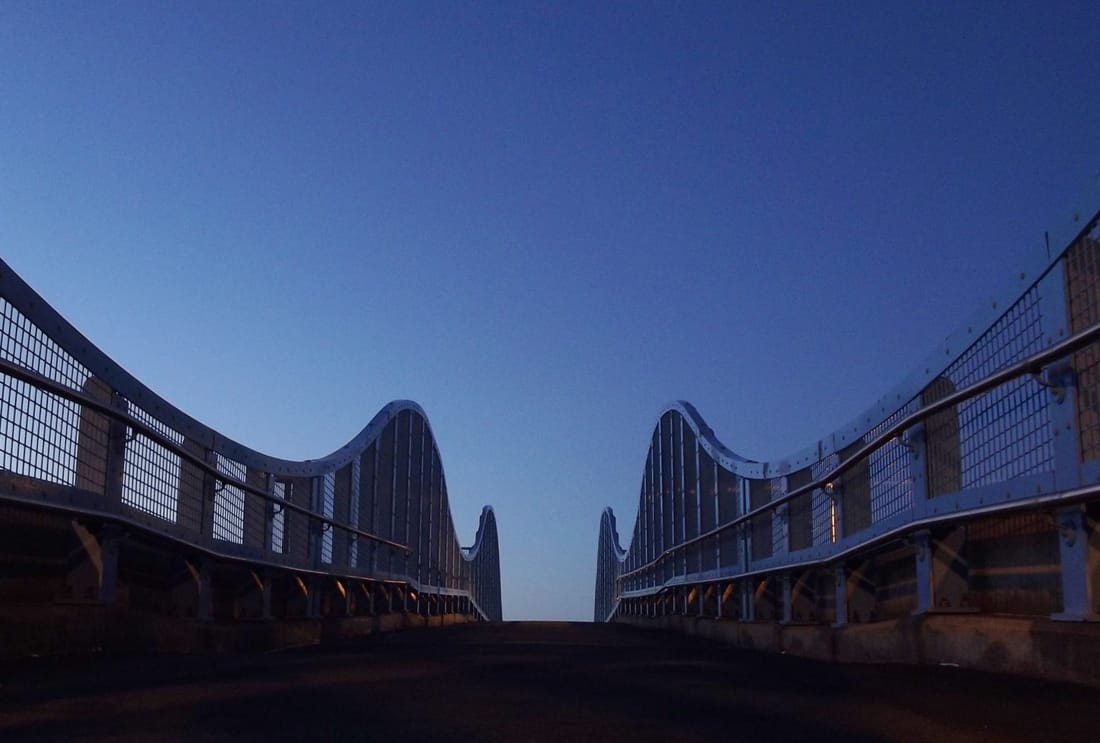
Photography Tip Image #4
|
For example, picture #3 above is pretty much an ordinary shot of a footbridge. However, by moving forward on the bridge and shooting from a lower angle, the poles and artificial lights have been eliminated from the image as you can see in picture #4. The result is a somewhat different picture of the same subject.

Photograpghy Tip Image #5, taken outdoors without Flash
|
Use Fill Flash for outdoor Portraits: Portraits taken outdoors in bright sun can sometimes result in unwanted shadows on the subject.
To eliminate or reduce the shadows on your subject, use your camera's flash. Wedding photographers have been using this technique for years when taking outdoor bridal party pictures. It is called using fill flash. You might try using the flash on auto mode to begin with but make sure the flash is not over exposing or "washing out" your subject |

Photography Tip Image #6 taken using Fill Flash
|
If the flash is washing out the subject, change the flash setting to 1/2 or 1/4 power setting. You might also try using fill flash outdoors when the lighting is low key and kind of dull. The fill flash will brighten your subject and give the picture a little more zip. Take a look at the two pictures shown above for an example of this technique.
Know your camera. Read the manual!. This photography tip should be unnecessary, but many folks just don't like reading instruction manuals. Everyone knows there is a ton of information about photography in books and on the internet. However, most of that information is about photography in general.
General information about photography is ok, but you should at least know what the buttons and dials on your own camera are for. Even if you normally just shoot in the automatic mode, you never know when a different camera setting might produce a more pleasing picture.
You might not enjoy reading an instruction manual, but more than likely there is useful information about certain camera features that are not obvious unless you read about them.
Skies too light? Use your sunglasses! Sometimes you might take a picture and the sky might seem a little too light even though the overall exposure might not be too bad. The solution is to use a polarizing filter. The polarizing filter will deepen the color of the sky as well as the other colors in the picture.
If you own a Digital SLR camera, you can buy a polarizing filter to attach to your camera's lens. However, you cannot attach a polarizing filter to a compact digital camera.

Photography Tips Image #7
|

Photography Tips Image #8. Taken using sunglasses as a polarizing filter
|
So, if you don't want to purchase the filter for your Digital SLR camera or if you only own a compact digital camera, use your sunglasses as a filter. The sunglasses must be the polarized type and they should be a somewhat neutral color. (sunglasses with a deep yellowish or brownish tint will cause that color tint to show in the picture).
Just place one of the sunglasses lenses directly in front of the camera lens when you take the picture. (make sure the curved edge is pointing away from the camera.) The polarizing effect works best when your subject is at about a 90 degree angle from the direction of the sunlight. In other words, the sun should be pointing towards your left or right shoulder when you take the shot.
Picture #7 above on the left was taken without any type of filter on the lens. Picture #8 was taken with a pair of inexpensive polarized sunglasses placed in front of the camera lens. Notice that the color in picture #8 is deeper than in picture #8. This inexpensive photography technique may come in handy in many situations.
If you decide to use this photography tip, you might want to use a Tripod when taking the shot. Although the tripod is not a necessity, it will keep the camera steady while you hold the sunglasses in front of the camera lens.
Have something in mind. Before taking a picture, give some thought to what you are seeing in your camera's LCD screen or viewfinder. Remember that when you point the camera towards a subject, you are doing it because you see something interesting. So try to compose the image in a way that any viewer of your picture will clearly see what you were seeing.
Also, when viewing your image at a later time, you don't want to wonder why you took the shot, or think that you should have taken it differently. If you think about what you are trying to accomplish beforehand, your results will usually be better. Read Basic Photo Composition for a few more photography tips on picture composition.
Keep your horizon lines level. This might be one of the most obvious of the photography tips. Yet, taking pictures with a slanted horizon is a pretty common mistake that beginners make. The slanted horizon will usually occur when the photographer rushes or doesn't check to make sure the horizon is level on the LCD screen or in the viewfinder.

Photography Tip Image #9. Horizon Line is slanted.
|

Photography Tip Image #10, Horizon Line is level
|
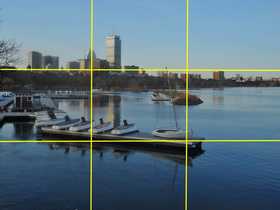 Photography Tip Image #11 showing camera grid lines
The horizon in picture #9 is obviously not level. The horizon line in picture #10 is pretty level and shows the scene the way our eyes would see it.
Many digital cameras have the option to show grid lines on the LCD screen. Grid lines are a great tool to make sure lines in your picture
are level horizontally as well as vertically. (that is if there is also something in the scene that you know should be straight up and down)
The picture of the skyline on the right is an example of what the grid lines might look like on your camera's LCD screen before you take the picture.
Check the background and foreground. This is probably one of the most important photography tips you should use. Many good pictures have been ruined because the person taking the picture failed to notice something distracting in the background or foreground of the scene.
So, check the background and foreground of the scene you will be shooting before taking the shot. This way you will see if there is anything in your picture frame that is distracting or drawing attention away from your primary subject.
Quite often you may be able to eliminate background distractions by shooting from a different angle or by getting closer to the subject.
The images below are simple pictures of a bowl of potpourri. But wait a minute! What is that in the upper left hand corner of picture #12? It is a TV remote control and surely has nothing to do with the subject of the picture. Notice how your eyes are drawn toward the remote control and away from the main subject. Once the remote control is removed, your eyes will focus on the main subject which is the bowl of potpourri.

Photography Tip Image #12. Distracting Object in Upper Left Corner of Frame
|

Photography Tip Image #13, No Distracting Object Showing in Frame
|
The point of this photography tip is to make sure you check the entire frame in your camera's viewfinder or LCD screen before snapping the picture. This principle should be applied whether you are taking pictures of people, outdoor scenes, and even a bowl of potpourri.
Be Ready and be quick. This photography tip might seen obvious, but realistically, most of us have missed a great shot by not being ready. Scenes with action or movement don't stop to wait for you. When you know that you will be shooting a scene or subject where some movement could be involved, try pre-focusing on the area where you would like to capture the shot of the subject. This way you can just concentrate on snapping the shot and you won't be fumbling with your camera as the action passes by.
When photographing people, whether it is a group or an individual, remember that they can become restless very quickly. Learn to choose your camera settings and compose the picture quickly. You will get better results and more cooperation when the subject doesn't have wait too long for you to take the shot. On the other hand.....
Take your time. This photography tip is the opposite of the previous photography tip. When shooting scenes with little or no movement, slow down. Take a little more time to pay attention to composing your picture. Spend more time checking to see how the light and shadows fall in your scene.
Sometimes the camera's light meter can be fooled by very bright or very dark areas in a scene. (resulting in underexposed or overexposed images) If so, take time to adjust your settings at the scene rather than having to make corrections with a photo editing program later.
Read the Exposure Compensation EV tutorial to learn how to make minor exposure adjustments using your compact digital camera. Check the Camera Exposure Basics tutorial to learn more about making exposure adjustments with a Digital SLR camera.
Also, if you have time, try to find a creative way of taking the shot. Try different angles or perspectives that might not be the same shot that everyone else would take.
Take plenty of shots. This increases your chances of having a great shot rather than a ho-hum shot. Try taking several slightly different shots of the same scene. Maybe the first shot will turn out to be your best shot. But then maybe not. When you have several images to choose from, you increase your chances of having one that is pretty much what you were aiming for when you took the shot.
Use a tripod. When you are taking pictures at night or in low light situations, the proper exposure setting will usually require a slower shutter speed. Most people cannot hold a camera steady enough to avoid blur in the picture when the shutter speed is below 1/30 sec. Even if your camera is in automatic mode, it may set a pretty slow shutter speed for you in low light scenes. Placing the camera on a tripod will solve the problem of camera shake and blur.
Read photography related material. Check out photography magazines, books, and websites for information. Stay refreshed on what is going on in the photography world. Even if you don't like to read, just look at the pictures. Sometimes you will see shots that you would like to imitate and then add a little of your own style to it.
Practice, practice, practice..........This probably the best photography tip and technique of all!