Photography Basics: Qualities of Natural Light
Light is the foundation of photography. Your camera cannot record images unless there is some sort of light to illuminate a scene or subject. That is true whether the light is natural or artificial. However, this tutorial is to make you aware of how Natural light conditions will have an effect on the overall look and color tone of your images.
What factors affect the overall look and color tone of your images? The main factors that will affect the color tone and look/mood of your images taken in natural light will be the outdoor conditions (weather) and the time of day that you are taking pictures.
What factors affect the overall look and color tone of your images? The main factors that will affect the color tone and look/mood of your images taken in natural light will be the outdoor conditions (weather) and the time of day that you are taking pictures.
Outdoor Conditions: Take a look at the images below taken under different outdoor conditions. Picture #1 was taken during the mid day hours on a clear day. The tone is neutral with no specific overall color tone dominating the image.
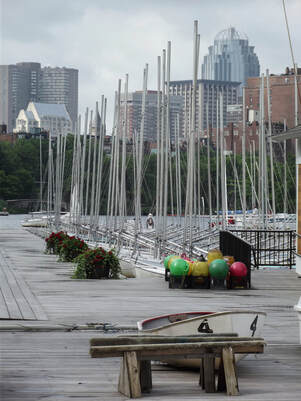
Picture #2 was taken on a cloudy, overcast day. The overall color tone of the image is cool and bluish/gray compared to image #1. One of the reasons that the cloudy day picture is more bluish gray is because the warmer natural sunlight rays are being difussed by the clouds. Although image #2 has a cooler/bluish overall tone, the colors in the image show well even though they are somewhat more subdued than if the picture was taken on a clear day.
Picture #2 was taken on a cloudy, overcast day. The overall color tone of the image is cool and bluish/gray compared to image #1. One of the reasons that the cloudy day picture is more bluish gray is because the warmer natural sunlight rays are being difussed by the clouds. Although image #2 has a cooler/bluish overall tone, the colors in the image show well even though they are somewhat more subdued than if the picture was taken on a clear day.
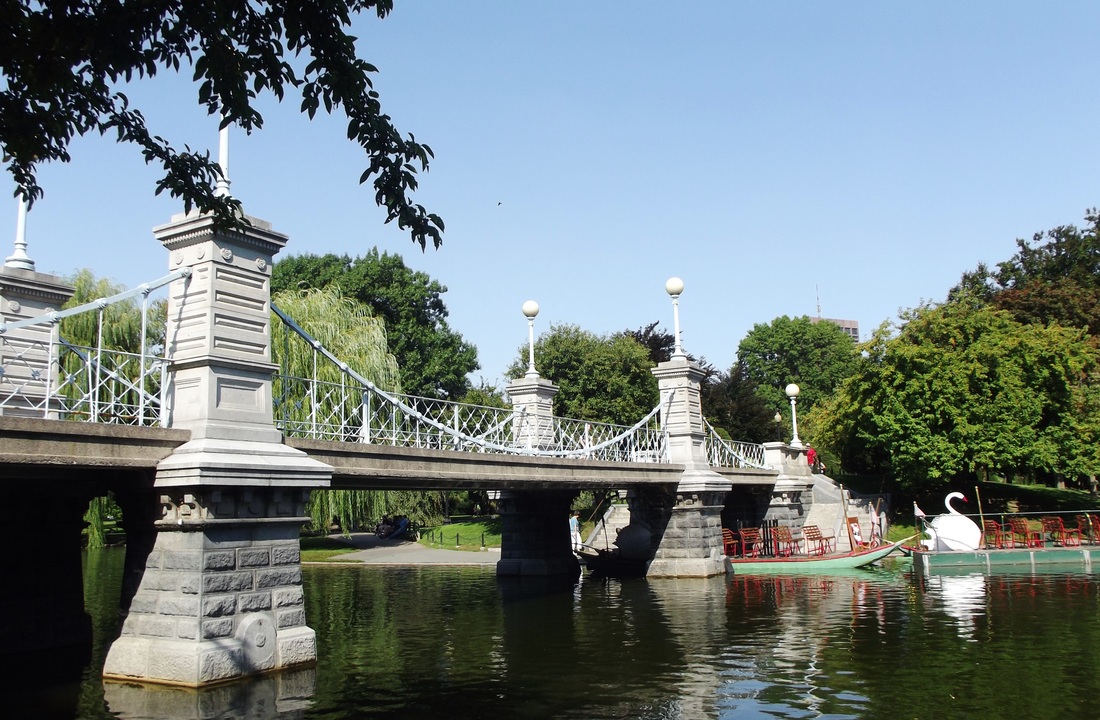
Image #10, Mid Day light with neutral tone
|
|
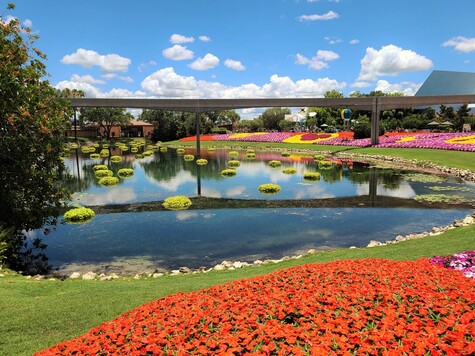
Shown below are a couple of extra examples of how natural light outdoor/weather conditions can affect the look of your pictures during the day. There are some scattered clouds in picture #3. However, this can be considered a mostly sunny day and there is plenty of natural sunlight reaching the scene that is not diffused by the clouds.
In many cases, a few scattered clouds in the sky will look just as good if not better than a plain blue sky. Take note that the color tone in picture #3 is still neutral like picture #1.
In many cases, a few scattered clouds in the sky will look just as good if not better than a plain blue sky. Take note that the color tone in picture #3 is still neutral like picture #1.
|

|
Picture #4 above was also taken on a pretty cloudy day. As you can see, the overall color tone of the picture is bluish/gray similar to picture #2. Again, that happens because the warmer color tones of the sunrays are being diffused by the clouds. Next, take another look at both pictures #2 and #4.
You wil notice that you can barely find any shadows in either image. That is an important charateristic of pictures taken on heavily overcast cloudy days that you should be aware of. (It also applies on days with rain or snow)
You wil notice that you can barely find any shadows in either image. That is an important charateristic of pictures taken on heavily overcast cloudy days that you should be aware of. (It also applies on days with rain or snow)
Technically, mid day refers to when the sun is highest in the sky around 12:00 pm (U.S). For the purposes of this article, the mid day hours are a couple of hours before the sun reaches its peak in the sky during the day and a couple of hours after it goes past its peak.
That is important to remember because the overall look and color tone of your pictures can be warmer prior to the hours before, and then after mid day. (especially on a clear day) This will be explained a little more in the section about Natural Light and the time of day.)
That is important to remember because the overall look and color tone of your pictures can be warmer prior to the hours before, and then after mid day. (especially on a clear day) This will be explained a little more in the section about Natural Light and the time of day.)
The Time of Day Affects the Overall Color Tone of an image: The pictures shown above are considered mid day photos but the emphasis of the text was on weather conditions,
Lets take a closer look at Mid Day light which is probaby the most common time for average photographers to take pictures.
Lets take a closer look at Mid Day light which is probaby the most common time for average photographers to take pictures.
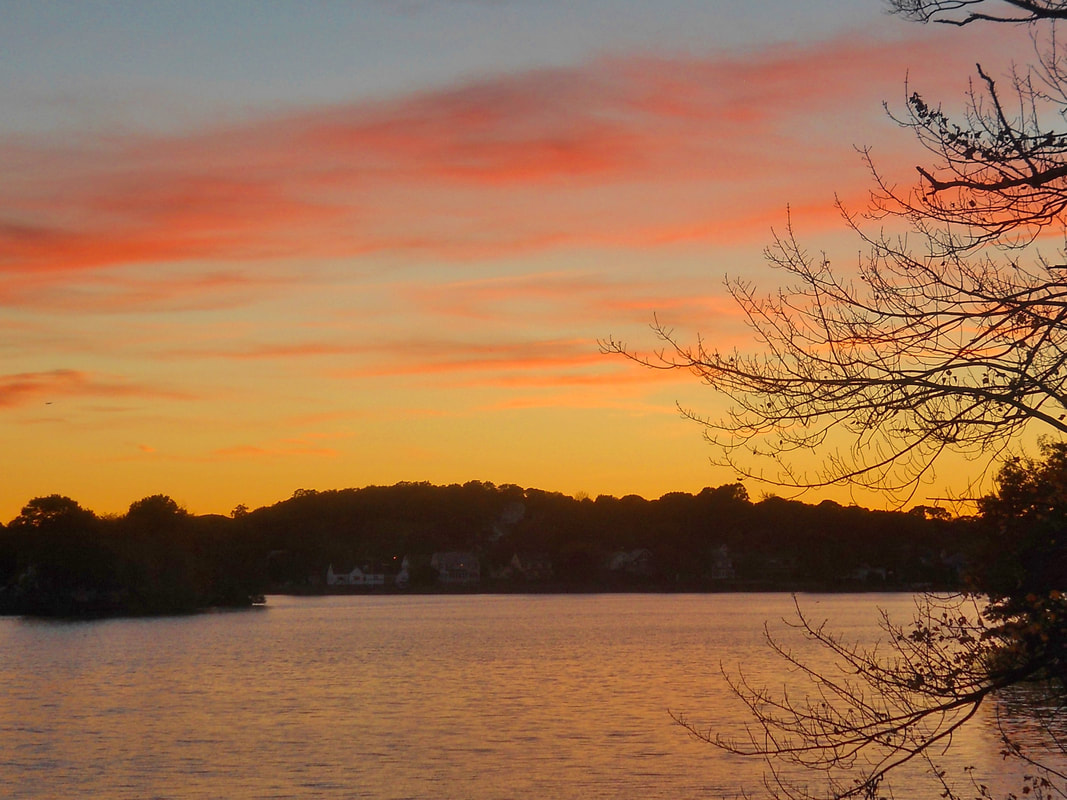
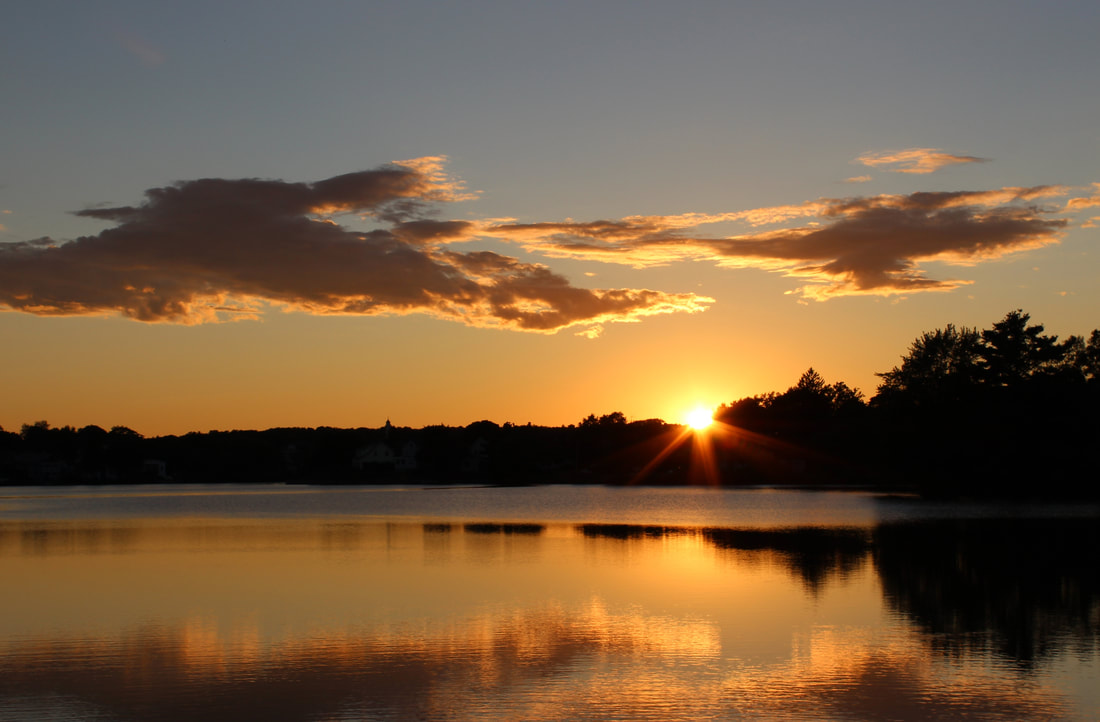
Sunset and Sunrise: Sunsets and sunrises are a beautiful part of nature that happens every day and no two of them are the same. Sunsets and sunrises will create warm yellowish/orange and even red tones in the sky depending on the atmospheric conditions. Those tones will be deeper in color and vibrance than during the Golden Hour.
|

|
|
|

|

|

|
An important thing to consider when taking sunrise/sunset images is that if the your camera's exposure meter reads the sun as the primary source of light, it will automatically darken everything else around it. Try focusing your camera on something else in the frame
Midday Light: Sunlight is the strongest during the mid day hours. Midday light is often referred to as hard light. Depending on the angle of the sun during midday hours, the sunlight will produce the darkest and sharpest shadows of the day in your images. (during a clear or partly clear day) So make sure you pay attention to any areas of shadows that may show in your images taken during mid day to see if the results are acceptable to you.
For example, Image # was taken during miday hours on a very clear day. The photographer was standing under a group of trees. But notice that the strong midday light produced deep shadows in the the image.
For example, Image # was taken during miday hours on a very clear day. The photographer was standing under a group of trees. But notice that the strong midday light produced deep shadows in the the image.

|
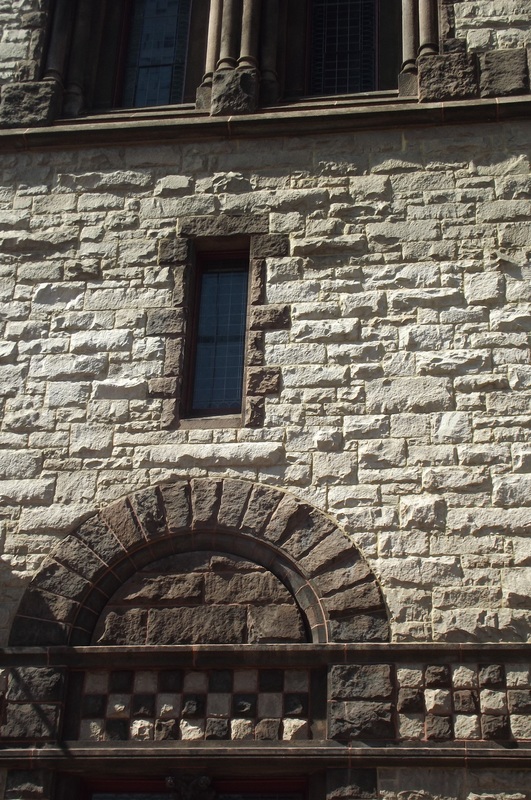
Image #5, contrast shows more detail in image
|
That does not mean that the picture is no good. Shadows are a part of nature and we see them every day. You as the photographer will have to make a judgement as to whether the shadows enhance or detract from the overall look of your image.
Hard bright sunlight will also produce more contrast in an image than the diffused light from a cloudy day. Contrast is the tonal difference between light and dark areas. For instance, picture #5 was taken on a clear sunny day. The shadows that are cast on the bricks creates contrast, which helps to bring out the texture and detail of the wall better.
If you are taking midday portrait images, pay attention to any shadows falling on your subject, especially on the face. When taking natural light portraits during midday, it is probably better to take the picture in a shaded area. The light in a shaded area is similar to cloudy day overcast light. The light is more even and won't produce images with deep dark shadows in one area and bright light in another area.
So far, this article has only addressed mid day natural light color tones whether the sky is clear or cloudy. However, there are times during the day that produce great color tones that are different than the previously mentioned midday color tones. Those times are known as the Golden Hour, Sunset or Sunrise and the Blue Hour.
For example, Image # was taken during miday hours on a very clear day. The photographer was standing under a group of trees. But notice that the strong midday light produced deep shadows in the foreground area of the image
Sunset and Sunrise: Sunsets and sunrises are a beautiful part of nature that happens every day and no two of them are the same.
Sunsets and sunrises will create warm yellowish/orange and even red tones in the sky depending on the atmospheric conditions. Those tones will be deeper in color and vibrance than during the Golden Hour.
Sunsets and sunrises will create warm yellowish/orange and even red tones in the sky depending on the atmospheric conditions. Those tones will be deeper in color and vibrance than during the Golden Hour.
What is The Golden Hour? The Golden Hour happens twice during a day. It is a short period during the very early morning or late afternoon/early evening when the sun is close to the horizon.
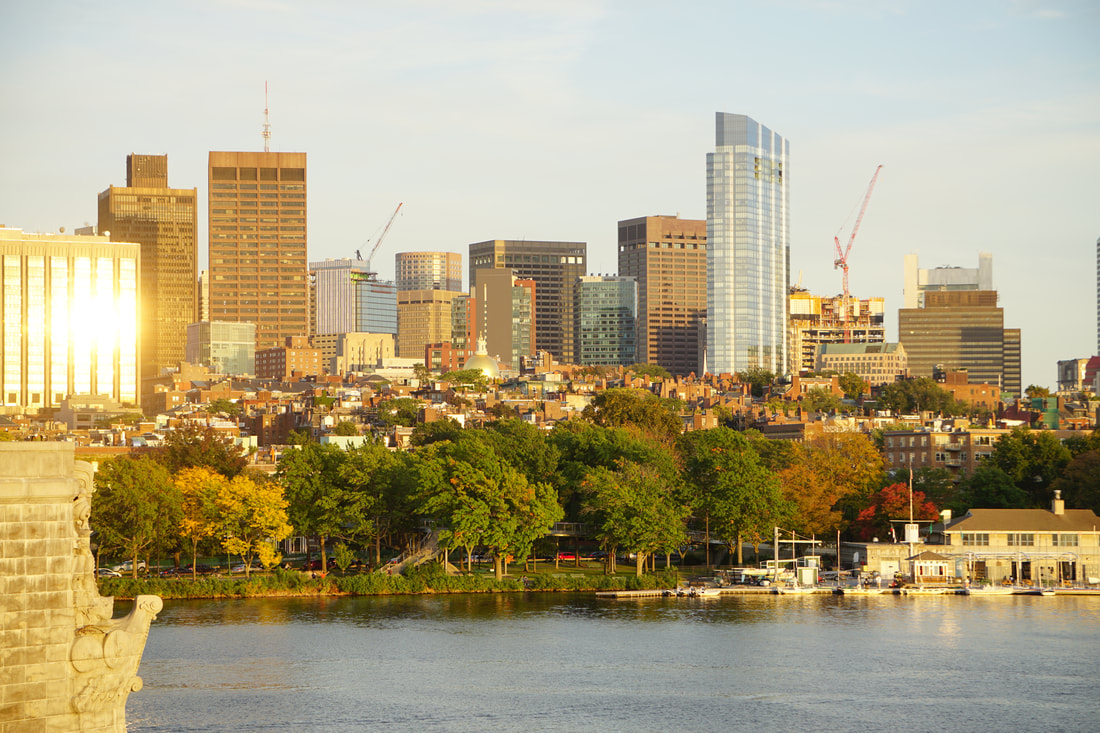
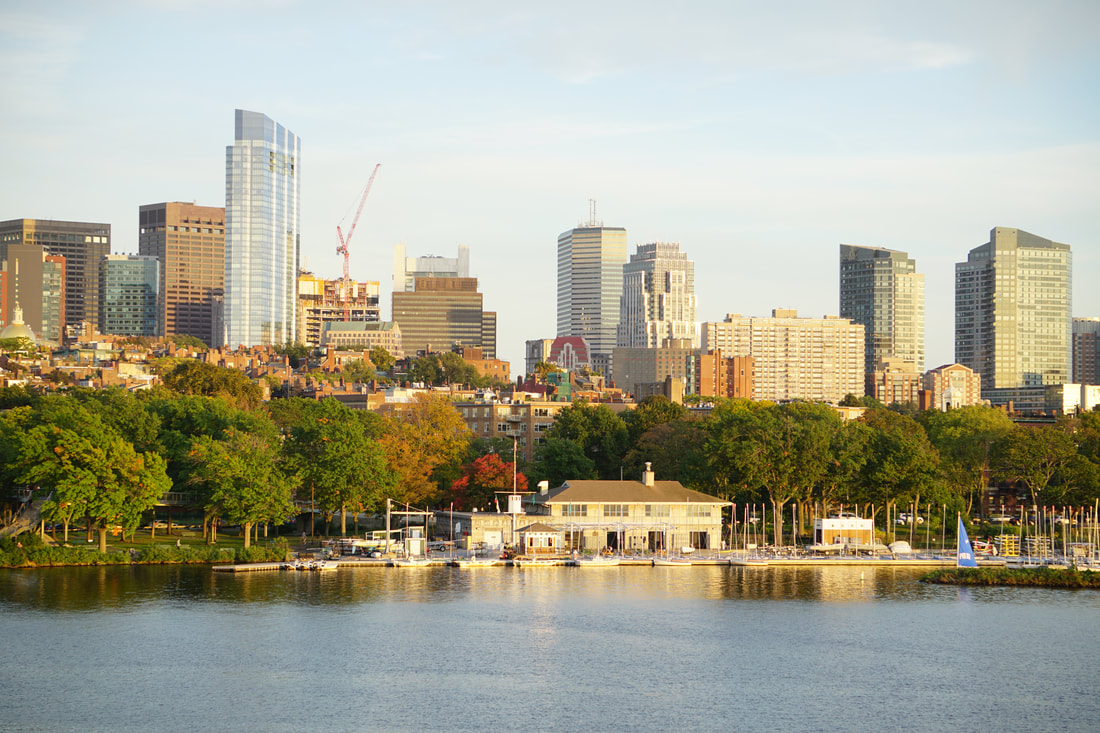
During the Golden Hour(s) the sun will produce very nice warm yellowish/orange/reddish color tones in the atmosphere and in your images. The sunlight during the Golden Hour will be warmer and softer than mid day light.
Images # and #2 shown below are examples of the color tone that will will show in your images during the Golden Hour(s).

|

|
The Golden Hour begins approximately an hour before an actual sunset or about an hour or so right after a sunrise. The easiest way to figure out the Golden Hour time is to check a weather app and look for the sunrise/sunset times. Then plan your photo shoot at least an hour before those times.
As a point of reference, the morning Golden Hour begins after the sun has just about risen above the horizon. The late afternoon Golden Hour begins approximately an hour before the sun begins to dip below the horizon going into sunset.
Please note that the color tone in the atmosphere after the morning Golden Hour will gradually begin to change from warm to neutral. On the other hand, in the later hours of the day, the atmospheric tone will gradually change from neutral to warm as the sun gets closer to the horizon.
In both cases the light will begin to change quickly. So it is a good idea to get to the location where you want to take pictures a little earlier than the sunrise or sunset Golden Hour.
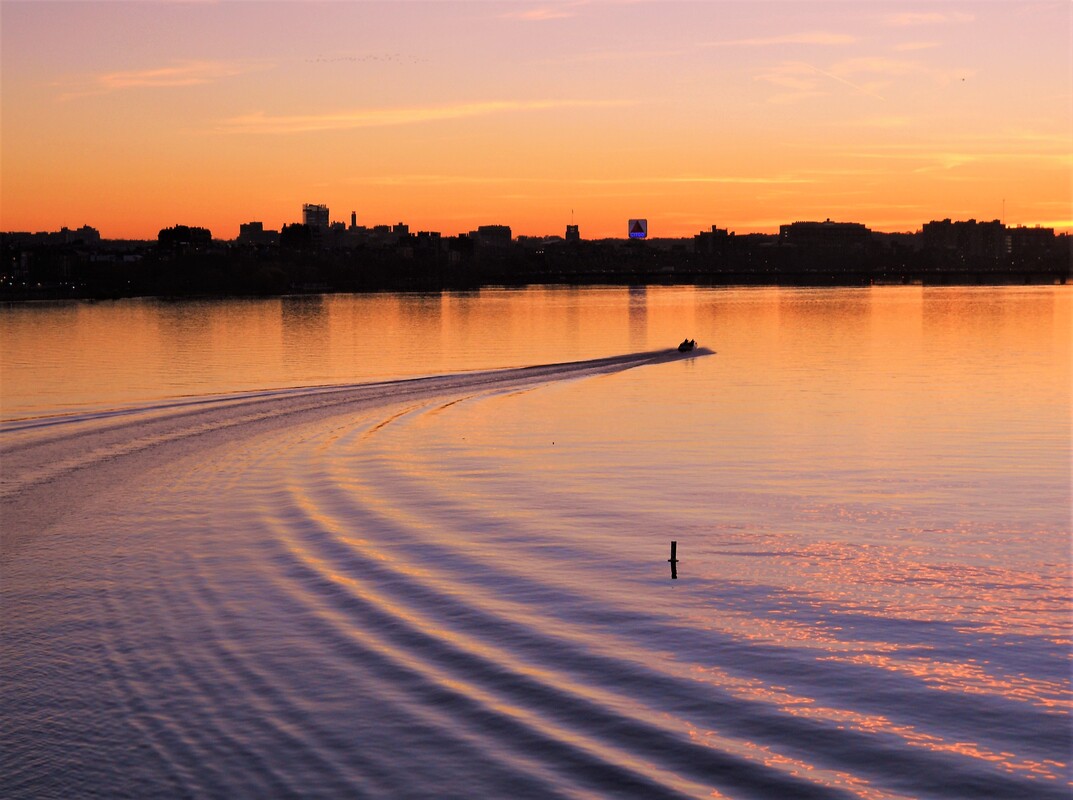
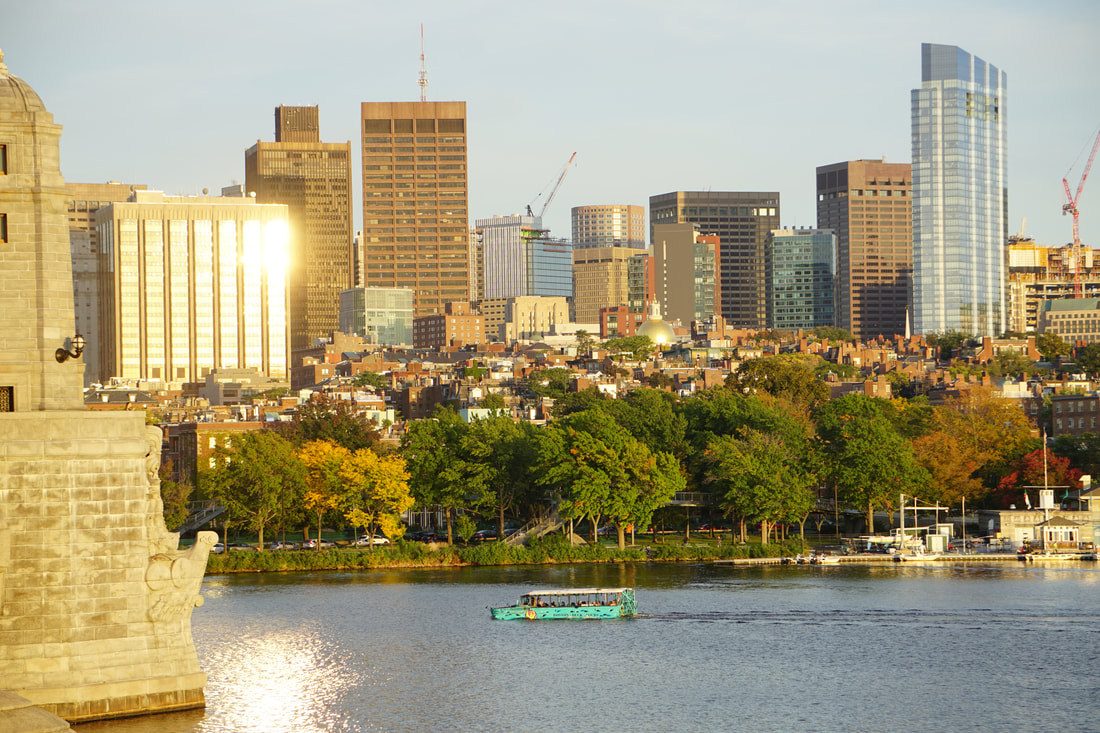
The bright spot in image # is a reflection from the sun.The picture was taken during the last hour before sunset. The reflection is so low on the building because the sun was pretty close to the horizon during the Golden Hour. (but not below the horizon)
As a point of reference, the morning Golden Hour begins after the sun has just about risen above the horizon. The late afternoon Golden Hour begins approximately an hour before the sun begins to dip below the horizon going into sunset.
Please note that the color tone in the atmosphere after the morning Golden Hour will gradually begin to change from warm to neutral. On the other hand, in the later hours of the day, the atmospheric tone will gradually change from neutral to warm as the sun gets closer to the horizon.
In both cases the light will begin to change quickly. So it is a good idea to get to the location where you want to take pictures a little earlier than the sunrise or sunset Golden Hour.
The bright spot in image # is a reflection from the sun.The picture was taken during the last hour before sunset. The reflection is so low on the building because the sun was pretty close to the horizon during the Golden Hour. (but not below the horizon)
Picture # was taken with the sun pointing just about directly at the subjects. Be sure to pay attention to the direction of the sunlight during the Golden Hour when taking pictures, especially when taking portraits. If the sun rays are falling to the left or right of the subject(s) it will cause shadows to fall on one side of the face(s). However, that might not necessarily be a bad thing if you are being creative and that is the effect that you want.
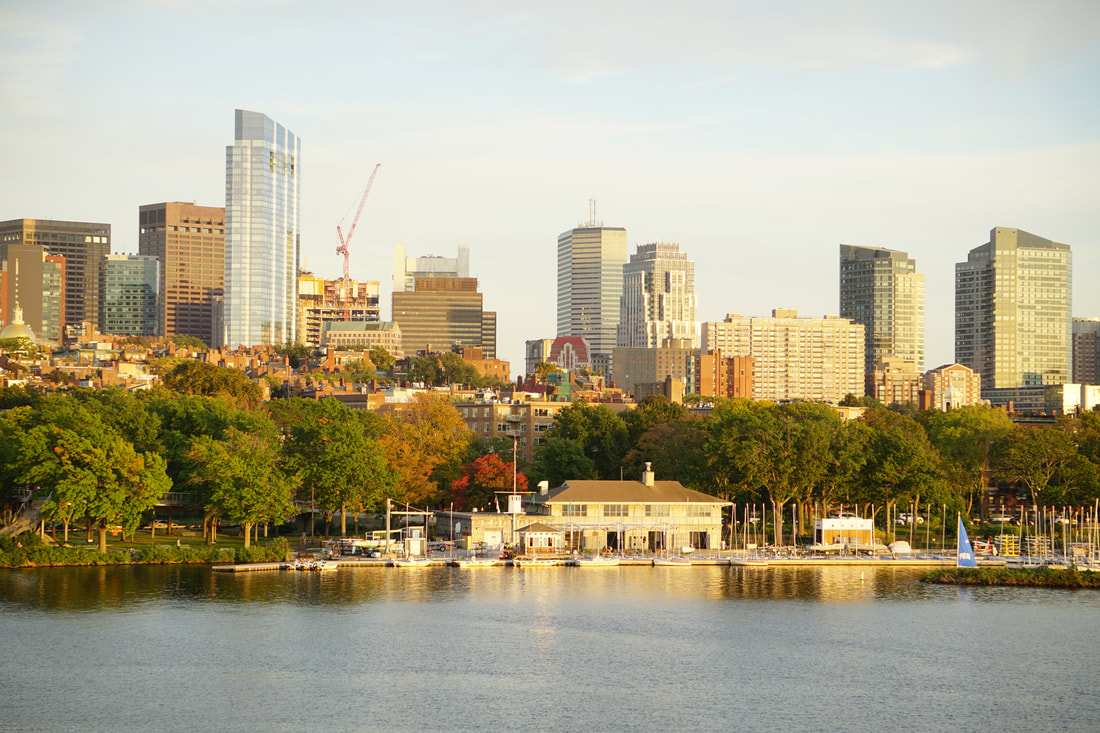
Picture # was taken during the morning Golden Hour, shortly after sunrise. Just so you know, as the sun continues to rise, the yellowish warm tones in the atmosphere will begin to fade and become more neutral like the midday pictures previously shown. (on a clear day)
Picture # was taken during the late afternoon about an hour or so before sunset. This is also a Golden Hour image. It also has a warm yellowish/orange color tone that appears when the sun is still close to the horizon.
Many people like to take portrait images during the Golden Hour. If the sun is behind your back and falling evenly on your portrait subject, you shouldn't have too many exposure problems.
However, if you take pictures of your subject with the sun behind them to get rim or halo lighting, you might have to adjust your exposure settings to keep from underexposing any faces in your image. That is because the sun coming into your lens might cause your image to be underexposed.
When is the Golden Hour?
The best way to figure the Golden Hour in your area is to check the sunset and sunrise times online. Then make it a point to be in the area about an hour or so prior to sunset or before the time of sunrise. It is important to note that the Golden Hour is not exactly 1 hour. So try to arrive a little earlier.
Give yourself time to set up in the best location for the pictures you want to take. Then keep in mind that the light changes very quickly. So you will need to be ready to start taking pictures before or during the time the light is changing.
Give yourself time to set up in the best location for the pictures you want to take. Then keep in mind that the light changes very quickly. So you will need to be ready to start taking pictures before or during the time the light is changing.
Sunset and Sunrise: Sunsets and sunrises are a beautiful part of nature that happens every day and no two of them are the same.
Sunsets and sunrises will create warm yellowish/orange and even red tones in the sky depending on the atmospheric conditions. Those tones will be deeper in color and vibrance than during the Golden Hour.
Sunsets and sunrises will create warm yellowish/orange and even red tones in the sky depending on the atmospheric conditions. Those tones will be deeper in color and vibrance than during the Golden Hour.

|

|
So far, there hasn't been any mention of which manual exposures should be used for the previously mentioned types of scenes. That is because there is usually enough light in the daytime to use an automatic setting.
Also, the main point of this article is to point out the different color tones you might encounter during the course of the day when taking pictures. However, if you are a person that prefers to use manual settings, check Camera Exposure Basics.
As the sun continues to rise in a sunrise Golden Hour scene, the yellowish warm tones from the sun rays will begin to fade and become neutral like the midday pictures previously shown.
Picture # was taken during the late afternoon less than an hour before sunset. This is also a Golden Hour image. It also has a warm yellowish/orange color tone that will appear prior to the actual sunset.
|
|
|
|
The first Golden Hour happens in the morning for about an hour or so after the sun has risen above the horizon (Sunrise). The second Golden Hour begins in the late afternoon about an hour before the sun begins to set below the horizon (Sunset).
The Golden Hour is great for producing nice portaits or landscape images since the light and shadows not as harsh as during mid day.
The Golden Hour is great for producing nice portaits or landscape images since the light and shadows not as harsh as during mid day.
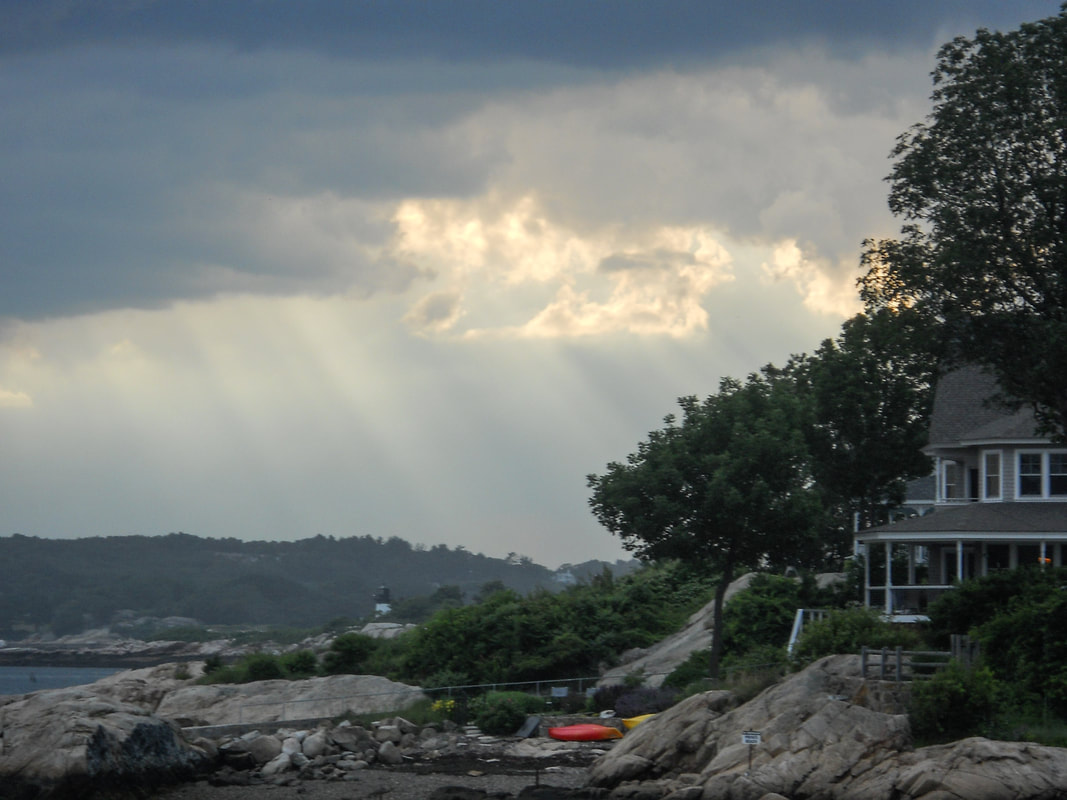
Image #2, Cloudy day light with a cool color tone
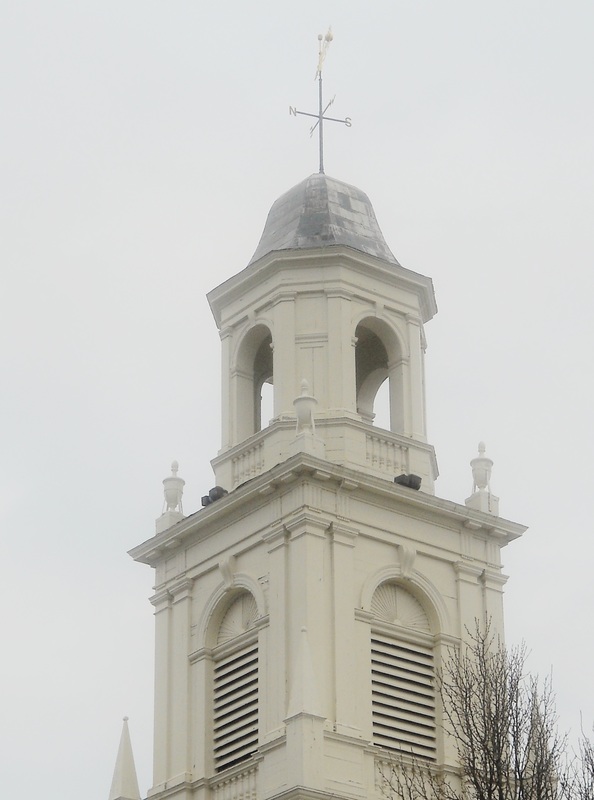
Image #4, taken under cloudy skies
|
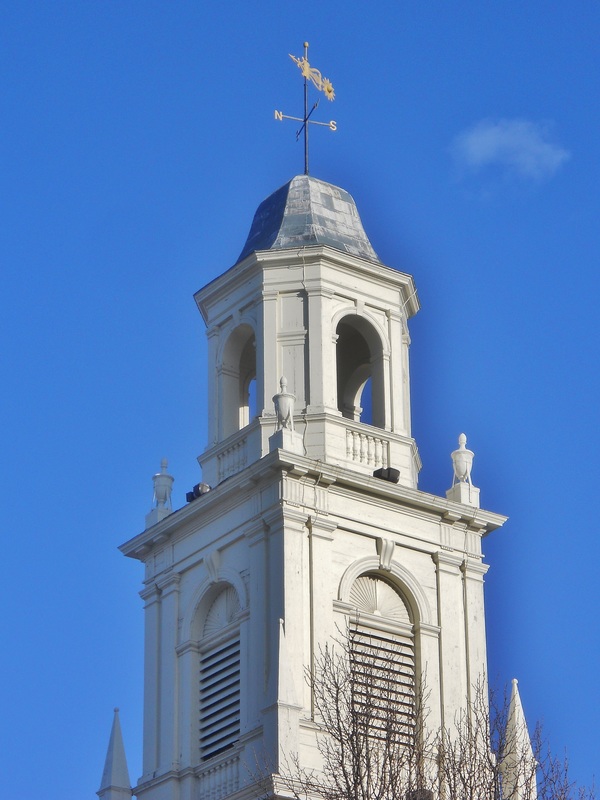
Image #3, taken under Clear Skies
|
What factors affect the quality of the available natural light? The main factors that will affect the quality of the natural light are the outdoor conditions and the time of day that you are taking pictures.
The outdoor conditions being referred to in this tutorial are the weather conditions. That simply refers to whether the sky is generally clear, cloudy, partially sunny, rain, etc.
The time of day you are taking pictures can also affect the look of your images. That is because the intensity of the light changes from sunirse to mid day to sunset. because the intensity and direction of the sunlight and shadows.
However, high contrast due to shadows from direct sunlight may have an undesired effect on certain subjects. For example, outdoor portraits with pronounced shadows showing on part of the subjects face are not always effective.
Picture #6 below with direct sunlight coming from one side has bright highlights as well as shadows falling on the subject. This type of lighting is not flattering for most portrait subjects.

Image #6, Harsh direct sunlight creates
unflattering shadows
|

Image #7, Better lighting with subject in shade
|
Take a look at picture #7. Although the background is still brightly lit by the direct sunlight, the woman is now standing in a shaded area.The lighting on the subject is now more even which makes for a more appealing portrait.
So remember that the light on a cloudy/overcast day does not appear as bright or harsh as light on a clear,sunny day. Pictures taken on overcast or cloudy days will produce very soft shadows if any at all. The same applies to pictures of subjects taken in shaded areas.
So remember that the light on a cloudy/overcast day does not appear as bright or harsh as light on a clear,sunny day. Pictures taken on overcast or cloudy days will produce very soft shadows if any at all. The same applies to pictures of subjects taken in shaded areas.
Time of Day Affects Overall Color Tone of Image: The color tone in your images will vary depending on the time of day you take your pictures. (that is, in addition to the weather conditions)
On a clear day, as the sun begins to rise in the early morning , you might see yellowish, orange, and even reddish tones in the atmosphere, especially near the horizon. (see picture #8) Those color tones will begin to quickly fade as the sun rises higher above the horizon.
On a clear day, as the sun begins to rise in the early morning , you might see yellowish, orange, and even reddish tones in the atmosphere, especially near the horizon. (see picture #8) Those color tones will begin to quickly fade as the sun rises higher above the horizon.
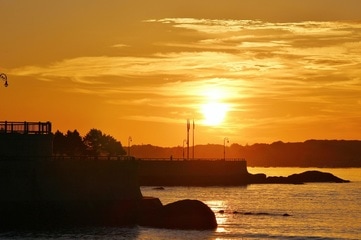
Image #8, Sunrise/Sunset light has deep yellow, orange color tones
However, even after the deeper sunrise color tones fade, there will still be a warm, slightly yellowish tone in the atmosphere from the sunlight. (for about an hour after sunrise or an hour before sunset)
You might not notice or pay attention to the warm light after sunrise or before sunset since it is not overwhelming, but it will definitely show up in your pictures. Picture #9, which was taken an hour or so after sunrise is an example.
In the morning, as the sun continues to rise, those warm tones will gradually fade until midday when the light will be somewhat colorless or neutral. Midday light is the brightest and often harshest light of the day. (when conditions are clear) At mid day, when the sun is at its highest peak, the light may produce hard, sharp, downward shadows on a subject.
Some photography articles will hint that it is not a good idea to take pictures at that time of day. However, that is not a practice that you should necessarily follow.
Take a look at picture #10. It was taken around mid day and the strength of the sunlight and any shadows in this case don't seem to detract from the image.
The decision as to whether or not you take pictures in the midday sun should depend on your subject and whether the final image will be acceptable to you.
After midday, the color tone in the atmosphere will gradually become warmer as we head towards sunset.
Take note that the visible color tone of a picture taken at noon will not be much different than one taken at 2:00 pm. However, the warmer color tones will be more noticeable as we move into the late afternoon hours. Then, once the sun begins to set, the deeper yellowish, orange, reddish tones will again begin appear until the daylight disappears into the night.
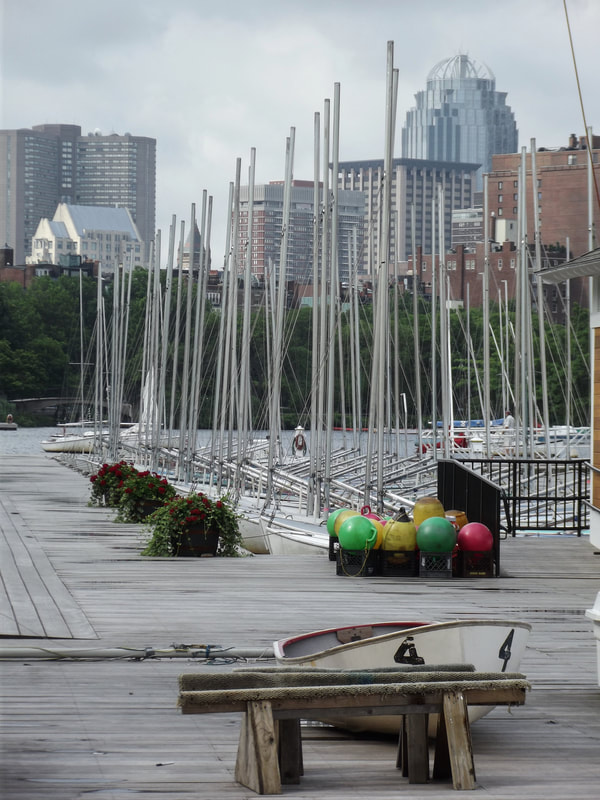 Image #11, Cloudy day with a cool color tone
If you are taking pictures on a partly cloudy day, the tone will still be generally cool. Picture #11 is another good example of a cool color tone.
However, any direct sunlight reaching your subject that is not diffused by clouds will have the normal characteristics for light at that time of day.
By the way, the color tones differ during the day because light has a temperature. Take a look at the light temperature chart in the White Balance tutorial and you will see why the color tones are different due to color temperature.
In closing, it is an undisputed fact that you can't change the natural light outdoors. Yet, just knowing how the light can affect the look of your images may affect how, when, and where you take your pictures.
Remember that the available natural light might not always fit what you want, but you should still strive to take the best possible shot with the light that is available.