Camera Phone-Smartphone Camera Photography Tips
Taking pictures with camera phones has become extremely popular. Camera phones are convenient to carry around and can be used for any spur of the moment or planned shot. The quality of pictures taken with camera phones has increased dramatically over the years.
Camera phones can be used for landscapes, portraits, or any subject of interest to you. An important thing for you to know is that the basic principles of photography such as available light, getting the proper exposure, and good picture composition are the same whether you are using a digital camera or a cell phone camera.
This tutorial will cover some of the most common modes and features found in camera phones as well as some photography tips and suggestions that can be applied with any camera you use.
This tutorial will cover some of the most common modes and features found in camera phones as well as some photography tips and suggestions that can be applied with any camera you use.
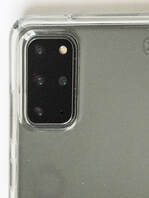
Clean Your Camera Lens! This might seem like a minor and pretty obvious thing, but it is extremely important. Remember, your phone is well.....a phone! You probably use it all day to take and make phone calls. When you take it out of your pocket or purse, you may accidentally touch the camera lens. That might create a smudge on the camera lens and it will show up in the next picture you take!
Also, dust or any other small particles that may be in your pocket or purse can get attached to the camera lens and that might show up in one of your pictures unexpectedly. So clean your camera phone lens on a regular basis. A soft cloth or even a t shirt will get the job done!
Also, dust or any other small particles that may be in your pocket or purse can get attached to the camera lens and that might show up in one of your pictures unexpectedly. So clean your camera phone lens on a regular basis. A soft cloth or even a t shirt will get the job done!
Get to know your camera phone features: Reading the phone's instruction manual about the camera can be very helpful, but most people don't spend much time reading the instructions. Why bother when you can just open up the camera app, shoot on automatic and get great pictures. However, you'd be surprised at some of the things built into todays camera phones that might assist you in taking even better pictures.
The screenshots and pictures shown in this tutorial were taken with a Samsung Galaxy S20+ camera unless otherwise noted. Of course your camera phone screen won't look exactly the same unless you have the same phone, but there are probably similarities that may help guide you.
The screenshots and pictures shown in this tutorial were taken with a Samsung Galaxy S20+ camera unless otherwise noted. Of course your camera phone screen won't look exactly the same unless you have the same phone, but there are probably similarities that may help guide you.
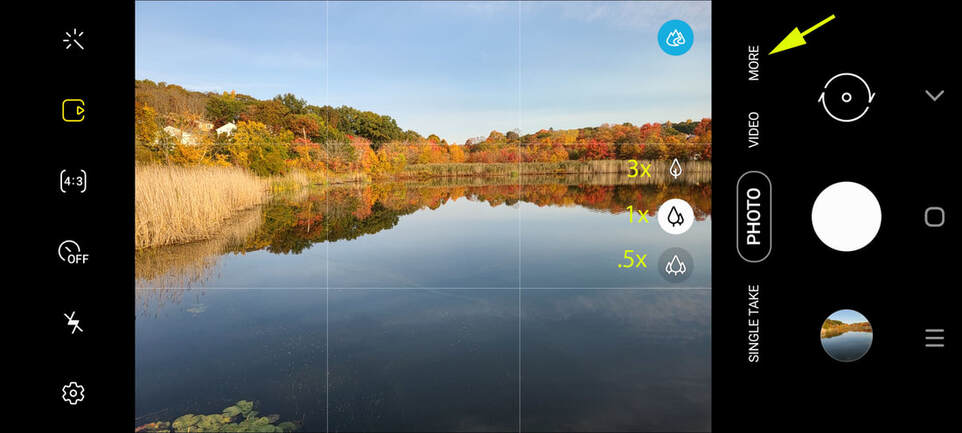
The image shown above is a screenshot of what you might see when you first open your camera app. It shows icons that will take you to the camera settings, the self timer, the video mode and a few other things. The 3X, 1X, and .5X in yellow on the screen are not part of what you would see on the screen but have been superimposed to indicate the length of the zoom for each of the icons to the right of them.
The default setting of 1X is highlighted in white. Touching that icon or either of the other 2 settings will change the zoom length. The .5X is the ultra wide lens, the 1X is the wide angle lens and the 3X is the zoom lens.
You can also change the zoom setting on most camera phones by placing your thumb and forefinger together on the touchscreen and then sliding them apart to zoom in for closer (telephoto) views than the default zoom settings previously mentioned. You can also zoom out by placing your thumb and forefinger apart from each other on the touchscreen and then sliding them together for wider angle shots.
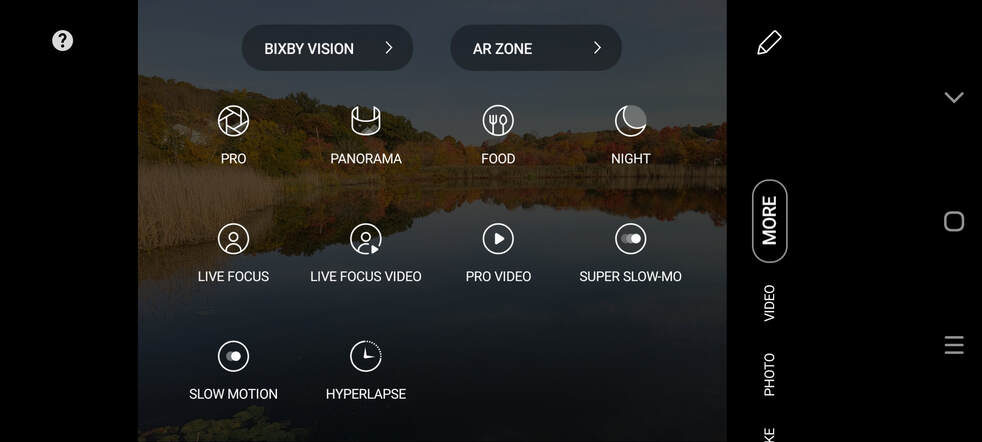
Using the camera in its Auto mode from this screen will generally produce pretty good images most of the time, but notice the arrow pointing to "MORE" on the screenshot above. Touching "MORE" will take you to a different screen with other settings/modes that you can use in the camera. The screen shot below shows the the screen that comes up after your press "MORE".
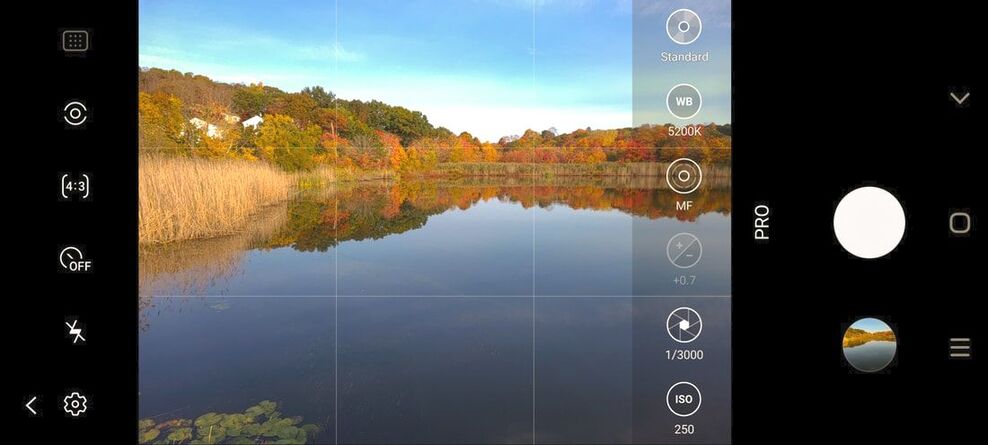
Now you see different shooting modes that you can use instead of automatic, including different video modes. The screen shot below shows settings that can be used when the "PRO" mode is pressed from the previous screen shot. Touching any of those icons will bring up another screen that will allow you to manually control things like the shutter speed and ISO and more. Sometimes using the manual settings can help to produce a better exposed image.
Most recent model phones will have a slider that will allow you to darken or lighten the picture (exposure) before you take the shot. They will also have a built in app for photo editing that will allow you to adjust the exposure and color tone of the image among other things after the picture has been taken.
The point here is that you might want to at least take a look some of the settings and features that your camera has above and beyond the automatic mode. You may find some of them helpful, or some features may not be of any interest to you at the moment. But at least you know they are there if needed.
The point here is that you might want to at least take a look some of the settings and features that your camera has above and beyond the automatic mode. You may find some of them helpful, or some features may not be of any interest to you at the moment. But at least you know they are there if needed.
Adjusting the Exposure (if needed)
Camera phones take pictures that are properly exposed most of the time. However, there are times that an image might be too light or too dark. That is a problem that can be easily fixed right on the camera phone touchscreen.
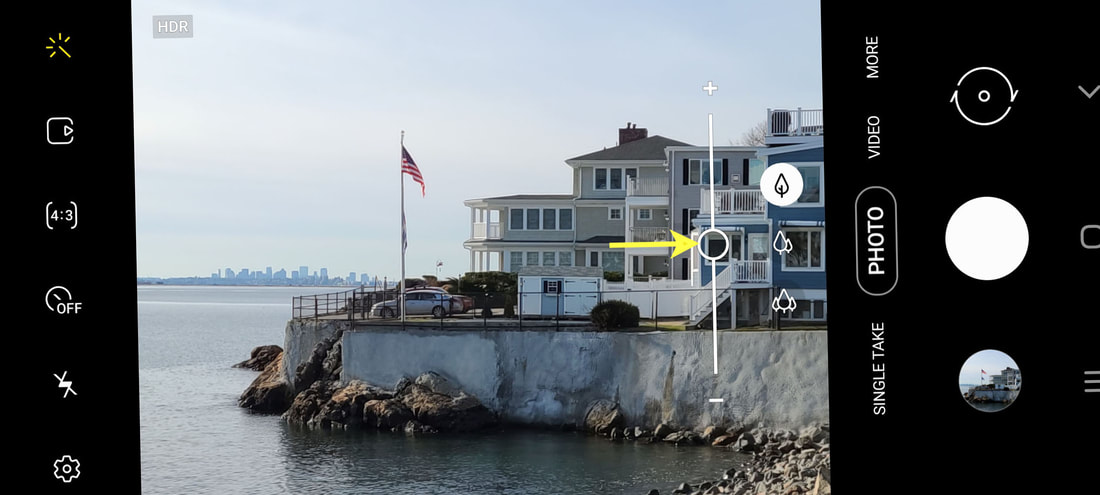
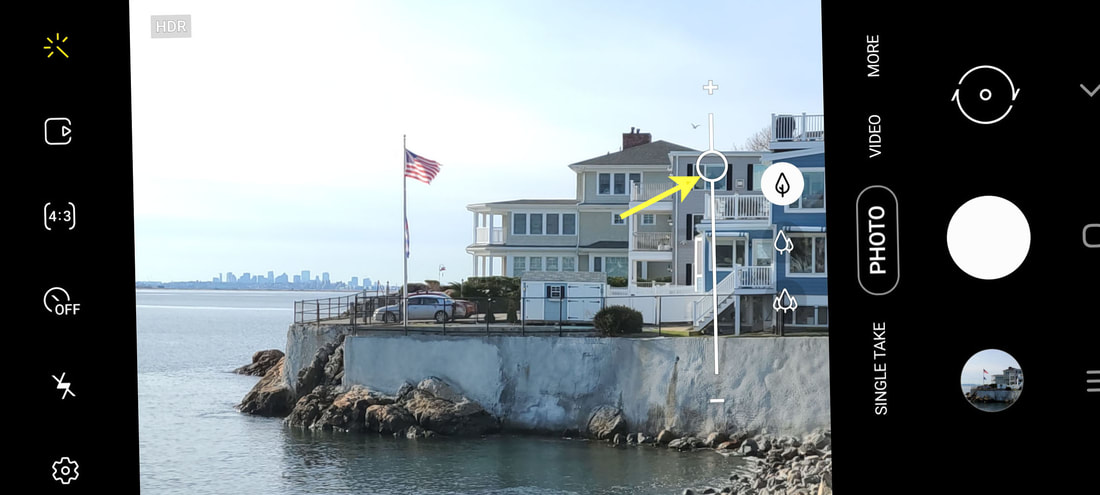
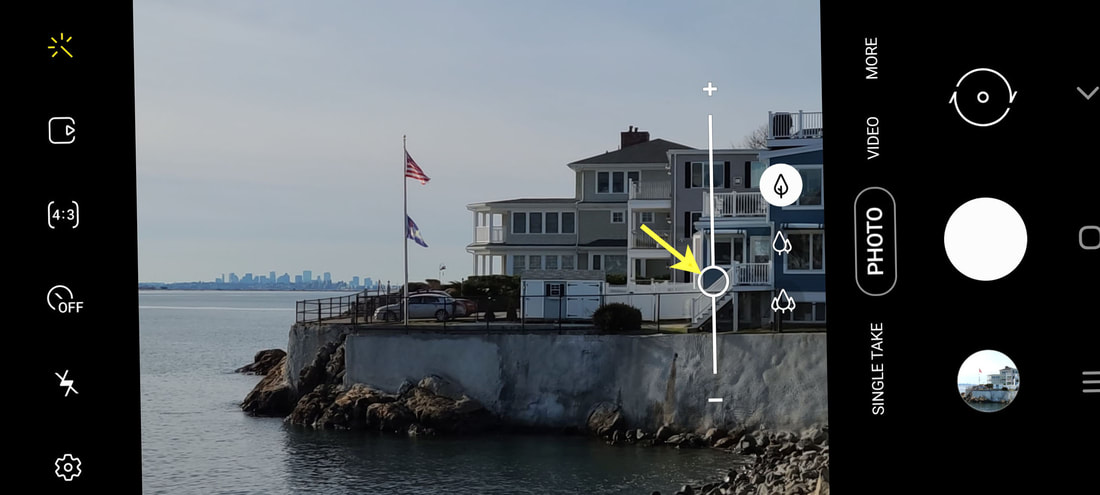
Simply touch the screen before taking a picture. You will then have the option to leave the exposure as it is or change it by by moving the slider button up or down. The arrow in the screenshot below is pointing to the slider button. (touching any area on the screen will also set that portion of the image as the primary focus area)
The exposure for the image in screenshot #4 looks ok. However, if you wanted the picture to be lighter you would just move the slider button closer to the + side of the slider bar as shown in screenshot #5 below.
On the other hand, if you feel that your image should be darker, you would just move the slider button to the opposite side of the slider bar as shown in screenshot #6 below.
If you have already taken a picture and later decide that you want to change the exposure, you can always go into the camera's photo editing app and make the same adjustments.
Use Your Camera Grid Lines
Just about every camera phone has a setting to show grid lines on your camera screen. These grid lines can help you to determine if anything such as the horizon in your image is not level. As you can see, the horizon line in image #1 is slanted. A slight slant in the horizon may not be noticeable when taking a quick shot or when viewing a scene in the camera's small LCD screen.
Just about every camera phone has a setting to show grid lines on your camera screen. These grid lines can help you to determine if anything such as the horizon in your image is not level. As you can see, the horizon line in image #1 is slanted. A slight slant in the horizon may not be noticeable when taking a quick shot or when viewing a scene in the camera's small LCD screen.
However, using the grid lines as shown in image #2 can assist you in making sure the horizon is level.
It is quite easy to have the grid lines show in your camera phone's LCD screen. For most android phones you can just open the camera app, go to settings, and then click "Grid". For Apple IPhones, go to settings, then camera, and click the "Grid" button.
Just so you know, the grid lines will not show up in your final image.
Hold Your Camera Steady! Blurred pictures due to camera shake are a common problem in photography. Fortunately, in the Auto mode, todays camera phones are generally programmed to use the fastest shutter speed that corresponds with the available light to create a properly exposed picture.
Faster shutter speeds help to minimize blur in pictures caused by camera movement. However, if you are taking pictures in a low light situation such as at dusk or night, the shutter speed will be slower, increasing the chance of a blurred picture due to camera shake.
Holding your camera phone with two hands will give you more stability when taking a picture. You should also try to keep your upper arms pressed against the sides of your body when taking a picture. That adds even more stability.
Another way to take pictures in low light or at night (when no tripod is available) would be to rest the camera on or against a solid surface. That will help reduce the amount of camera shake blur that may appear in the picture.
Image #3 was taken by placing the camera on a solid surface. The shutter speed used was 1/10 second and it is nearly impossible to get a very sharp hand held picture at that shutter speed. Yet, Image #3 looks ok on this screen. However, if the image was enlarged, you would see that it is an acceptable image but not totally sharp.
So the conclusion here is that bracing the camera phone on a solid surface and possibly getting a slightly out of focus image is better than walking away with a very blurry shot. (or no picture at all)
Use a Tripod
The best solution to reduce the chance of blurred pictures due to camera movement is to use a tripod. When using a tripod, the chance of camera shake is just about eliminated and your pictures should come out pretty sharp.
Image #4 was taken at night using a tripod. The camera's night mode was used to take this picture. In that mode, the camera set a shutter speed of 1/4 second which is even slower than the one used for the previous image. A tripod was definitely needed.
It is also recommended that you use the camera's self timer when using the camera phone on a tripod. That will eliminate the need for you to touch the camera shutter button when taking the picture and it decreases the possibility of camera shake even more.
In most cases you will need to use a cell phone holder/bracket like the Neewer Smartphone Holder to attach the phone to the tripod. That is because all regular digital cameras have a socket on the bottom of the camera that allows it to be attached to the tripod. Camera phones don't have that socket so you will need a cell phone holder to attach the camera phone to the tripod.
If you need a tripod or mini tripod, there is a wide variety of them available at Amazon.com. The cell phone holder is included with many of the tripods that are available there.
Try Using the Rule of Thirds
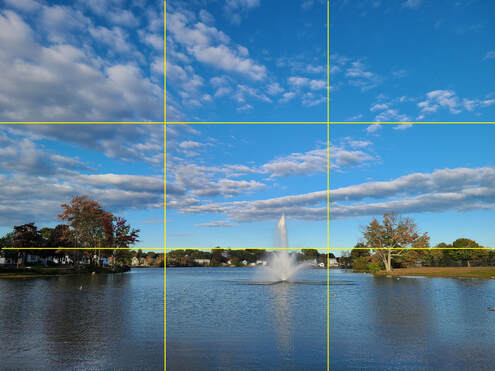
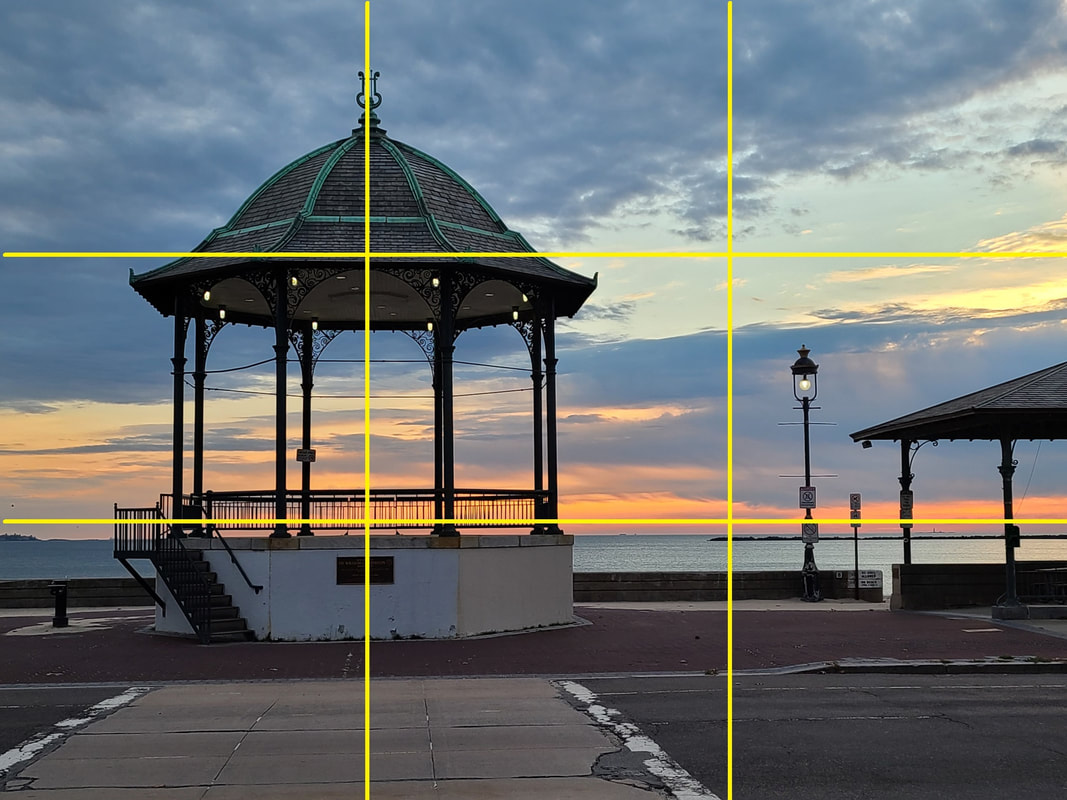
The "Rule of Thirds" suggests that a subject should be placed in an area of the image that is near what are called "Points of Interest" or along horizontal or vertical line areas of the image that are not at the exact center of the frame. The previously mentioned gridlines are a great help if you choose to use the "Rule of Thirds" when composing a picture.
As you can see, the grid consists of 2 equally spaced horizontal lines that divide the image horizontally into thirds and 2 equally spaced vertical lines that divide the image into thirds vertically.
The points of interest are the 4 points where the horizontal and vertical lines intersect. When using a point of interest to compose your picture, the rule of thirds suggests that the primary subject should be placed at or around these points rather than in the center of the image.
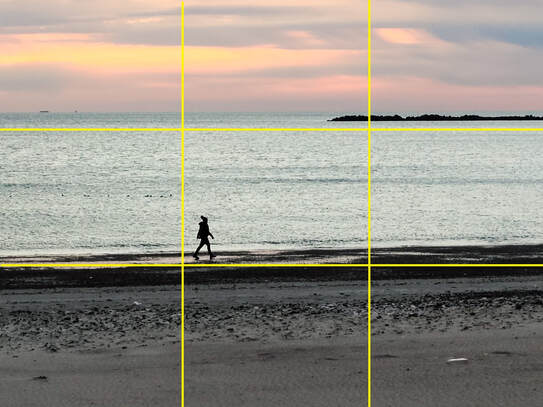
Take a look at image #5. Although the person walking next to the water is small in the image, the eye is still drawn to that portion of the image and the direction of the movement.
As you can see from looking at image #6 with the gridlines, the subject is near one of the points of interest. For reference, please note that when using the rule of thirds, subjects don't have to be exactly at a point of interest or exactly aligned with the horizontal or vertical gridlines. Just try to place subjects near them. That way, you will usually be able to get a nicely balanced picture.
As you can see from looking at image #6 with the gridlines, the subject is near one of the points of interest. For reference, please note that when using the rule of thirds, subjects don't have to be exactly at a point of interest or exactly aligned with the horizontal or vertical gridlines. Just try to place subjects near them. That way, you will usually be able to get a nicely balanced picture.
Next, take a look at the Gazebo in image #7. Although the gazebo is off center, this is still a well balanced photo composition. Image #8 shows the same picture with the gridlines. Notice that the gazebo is aligned in the area of the left hand vertical gridline as well as at 2 points of interest. The viewers eyes are of course drawn to the gazebo as the main subject (since it is large) but there is space for the eyes to naturally view other parts of the scene.
When using the Rule of Thirds to photograph landscapes, it is suggested that you place the horizon somewhere around the top horizontal or the lower horizontal gridline of the image rather in the center. Notice that in images #5, and #7, the horizon is near the top horizontal gridline or near the lower horizontal gridline. Placing the horizon in those positions creates a more natural view than if it were placed in the center.
When using the Rule of Thirds to photograph landscapes, it is suggested that you place the horizon somewhere around the top horizontal or the lower horizontal gridline of the image rather in the center. Notice that in images #5, and #7, the horizon is near the top horizontal gridline or near the lower horizontal gridline. Placing the horizon in those positions creates a more natural view than if it were placed in the center.
Remember that the Rule of Thirds is just a guide. Feel free to break the rule if you think your own creativity works better for the subject you are photographing. However, if you ever feel at a loss about how to compose an image, the Rule of Thirds will probably work well for you.
 Camera Phone Tips Image #9
Pay attention to the location of your camera lens(es) The design of camera phones is quite different than that of a regular digital camera. A digital camera is designed so that it can be gripped without the photographers fingers winding up in front of the camera lens.
The design of camera phones is made for you to be able to place the phone up to your ear so that you can take or make phone calls.
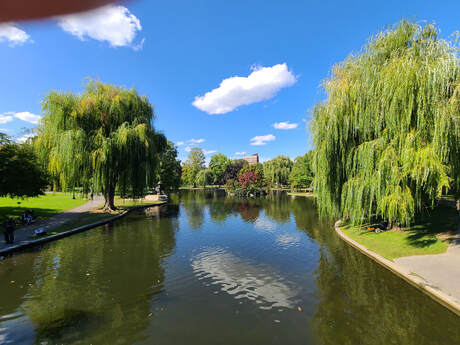
The slim rectangular design of cell phones causes you to place your fingers around the edges of the phone when you take a picture. Quite often the camera lens(es) of the phone are located quite close to areas where your fingers are holding the phone. This may result in the tip or part of your finger being included in the picture as shown in image #9.
The solution to this problem is very simple. Just be aware of where the camera lens is located on your phone and avoid placing your fingers there. Also, make sure you look closely at the entire frame of your camera screen before you take the picture. If your finger is in front of the camera lens you should be able to see it.
Limit the Use of Your Camera's Maximum Zoom: All camera phones have zoom capabilities that allow the photographer to increase or decrease the field of view seen on the camera's LCD screen. That is done through using optical zoom or a combination of optical and digital zoom.
Optical zoom is true magnification of a subject or scene that is done through the actual camera lens. The quality of the image remains pretty much the same when you zoom in or out.
With digital zoom, the camera just cuts away the outer edges of the image (that is called cropping) and stretches the rest of the picture to fit the camera screen. This results in lower image quality since cropping deletes many of the pixels that make up the total image.
Take a look at image #10 above that was taken using camera's 3X zoom. As you can see, the picture is clear, sharp and more than acceptable.
The camera that was used for this shot (Samsung Galaxy S20+) has multiple lenses and to achieve the 3X view, the camera just switches to its telephoto lens and very little if any digital zoom was required.
Next, take a look at image #11 below. The picture was taken at 30x zoom and it is not very sharp. (Enlarge slightly if necessary) The 30X setting was the maximum zoom for the camera and the highest zoom focal lengths will usually be achieved through the use of a lot of digital zoom.(in combination with some optical zoom)
It must be noted that camera phone manufactures have made great strides in combining optical and digital zoom so that the zoomed images are sharper than they were a few years ago. That has been accomplished by using mathematical algorithms, software for replacing pixels lost from digital zooming, and using information from multiple lenses found on the newest phones.
The conclusion here is that yes, you can get a somewhat decent image using a camera's maximum zoom, but it won't be of the highest quality. Using the maximum zoom can work if you absolutely have to get the shot, but in some cases, if possible, it might be better to just get closer or take the picture with less zoom.
The conclusion here is that yes, you can get a somewhat decent image using a camera's maximum zoom, but it won't be of the highest quality. Using the maximum zoom can work if you absolutely have to get the shot, but in some cases, if possible, it might be better to just get closer or take the picture with less zoom.
Take Pictures from Different Perspectives
Taking pictures from from different perspectives simply refers to shooting from different positions. That could be shooting up from a low position or shooting downward towards a subject. Or it could be moving in closer, further away, or to the left or right of a subject. Of course you can also zoom in or out to change the overall perspective of your shot. .
Taking pictures from from different perspectives simply refers to shooting from different positions. That could be shooting up from a low position or shooting downward towards a subject. Or it could be moving in closer, further away, or to the left or right of a subject. Of course you can also zoom in or out to change the overall perspective of your shot. .
The three pictures above show a bridge tower taken from 3 different positions which resulted in three different perspectives of the tower. Image #12 was taken at a very slight distance from the steps.
Image #13 was created by walking forward to the bottom of the steps and zooming in slightly to include part of the stairs as well as the tower. Image #14 was taken by walking further up the steps and then not including them in the scene at all. That created a really different view than the other two images.
The subject is the same in all three images but since they were taken from different perspectives, a choice can be made as to which one works best for the purpose the picture was taken.
Explore Your Camera's Photo Editing App
There may be times you might want to change the look or add effects to a picture you have taken. Every camera phone comes with a built in camera editing app. The app will usually have features that will allow you to crop, adjust the exposure, write text on an image, and use filters to change the color/tone of an image. (among other things)
Usually you can access your photo editing tools by going to your photo folders or gallery and opening the image you would like to edit. If necessary check your instruction manual for specific instructions about opening the editing app.
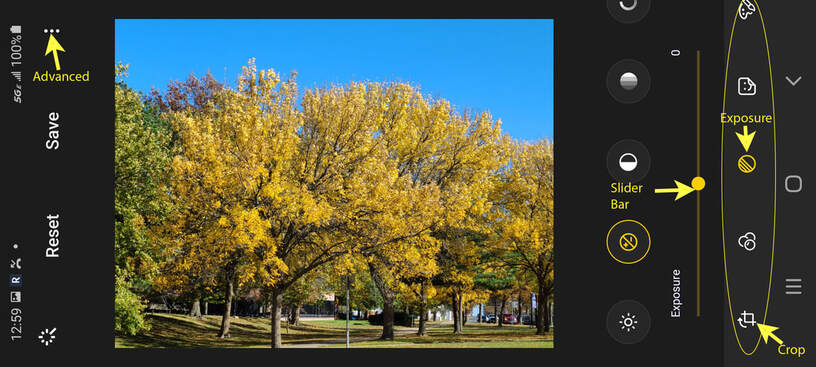
The screenshot #7 above shows some of the features available when using the Samsung Galaxy S20+ photo editing app. The slider bar is used to increase or decrease the overall exposure of the image. It is also used to change the contrast or the intensity of colors depending on which option you choose. There is also an advanced feature that will allow you to increase or decrease shadows as well as highlights in a picture.
Screenshot image #7 was a little dark. Image #15 above shows the result of using the editing app to increase the exposure (making it lighter), and adding a little more brightness to make the image more vivid. So using the editing app is a good way to change an image to more of what you think it should look like.
The Spot Color feature is available in some camera phone apps. Picture #17 below is an example from using the Spot Color feature. Picture #16 is the original image taken in color. Picture #17 was converted to all black and white but then the red color of the apples was restored just by touching one of the apples.
The Spot Color feature is available in some camera phone apps. Picture #17 below is an example from using the Spot Color feature. Picture #16 is the original image taken in color. Picture #17 was converted to all black and white but then the red color of the apples was restored just by touching one of the apples.
Keep in mind though that this feature will restore the color that is touched back to every area in the image that is the same color. (however, there will be an eraser and other features to help you get the effect you want.)
Using the camera's editing app is a great resource for correcting or improving your images right on the spot. Especially if you want to send the image to someone or post it on social media.
So it is a good idea if you at least take a look at what can be done when you use your phone's camera editing app. Play around with each of the features and use the slider to see how they affect the look of your image. You will probably find a few interesting or fun things in the app that can help improve the look of some of your pictures.
Try Using Leading Lines
Leading lines can be a strong tool in photo composition. Lines in an image attract the viewers attention and causes the viewers eyes to naturally follow the direction of the lines. That direction will be towards a particular subject or area in the image. Leading lines in an image can be horizontal, vertical, diagonal, converging and even curved. Leading lines can be seen when viewing roads, rivers, bridges, shorelines and railroad tracks among other things.
Leading lines can be a strong tool in photo composition. Lines in an image attract the viewers attention and causes the viewers eyes to naturally follow the direction of the lines. That direction will be towards a particular subject or area in the image. Leading lines in an image can be horizontal, vertical, diagonal, converging and even curved. Leading lines can be seen when viewing roads, rivers, bridges, shorelines and railroad tracks among other things.
The railings, the footpath and the road in image #18 all lead the eye through the image to the city skyline. These are strong compositional lines that the viewer will instinctively follow. This is an example of converging leading lines. You may also notice that leading lines can add depth or distance to the image when placed starting from the foreground to the actual subject area.
The top (road) portion of the bridge in image #19 creates a leading line with a downward slope. Once again, the eye sees it and will follow the line to see where it is going. As you can see, it is leading directly into a town/city.
Leading lines don't have to be straight, pointing at something or someone. Leading lines work well as long as they guide the viewers eyes through a good portion of the image. The railing in the lower portion of image #20 grabs the viewers attention since it is right in the foreground. However, it causes the eye to follow it towards other areas of the image. .
Just remember that there are all kinds of leading lines around you. Just experiment and see how you can get them to work best for what will be pleasing to you or the viewer.
Just remember that there are all kinds of leading lines around you. Just experiment and see how you can get them to work best for what will be pleasing to you or the viewer.
Try Using the Blurred Background Effect
In photography any reference as to how much of an image is in sharp focus from the subject and/or the foreground to the background is known as its Depth of Field. Camera phone lenses are wide angle lenses and will produce images with "deep or wide" Depth of Field.
That is actually a great feature for the photographers. An image with deep depth of field will be mostly in focus from the foreground to the background. Image #21 is an example of an picture with deep depth of field.
Image #22 is an example of of a picture with "shallow or narrow" depth of field. Although the subject is in focus, the background is not in focus. Creating pictures with a blurred background is a technique that has been used by photographers for years, especially for portraits. Blurred backgrounds work well with portraits because it has the effect of making the subject stand out more and there is less distraction in the background.
Digital Slr and Mirrorless camera users can create shallow depth of field in an image through the use of wide apertures and longer focal length lenses among other things. At this time, depth of field cannot be manually controlled in the same way with smartphones.
However, the newest cell phone cameras are able to create shallow depth of field through software built into the phone. In the latest Samsung phones like the S20 series, you will be able to control the depth of field by by going to the "Live Focus" mode. You can then control the amount of blur with a slider. You can also choose the area of the image that you want in focus simply by touching that area on the phones' touch screen.
The newest Apple "I" phones also have software built into the phone to create shallow depth of field. It is located in the "Portrait Mode". There, you can also control the amount of blur with a slider. The great thing about blurring areas in your images is that if you don't like the effect, you can just eliminate it with 1 click.
One of the limitations of this type of "depth" software is that you have to stay within 3-8 feet of the subject depending on which phone you are using. However, it is still worth trying to see how this effect could work for you.
These were just a few tips about using your cell phone's camera. So take a few minutes to explore what features are included in your phone's camera and you will surely be able to improve your phone camera photography.
