Using Exposure Compensation EV+ EV-
Most of the time, your digital camera will produce well exposed images using the settings suggested by the cameras' light meter. However, there are times that your digital camera will produce an image that is too light or too dark. That can happen because your digital cameras' light meter can be thrown off when there is tricky lighting in a scene
Or, there may be times you just want your image to be lighter or darker to fit your personal taste. In either case, those are situations when you might want to use your cameras' Exposure Compensation EV+/- feature.
Or, there may be times you just want your image to be lighter or darker to fit your personal taste. In either case, those are situations when you might want to use your cameras' Exposure Compensation EV+/- feature.

Exposure Compensation Setting EV+1
|
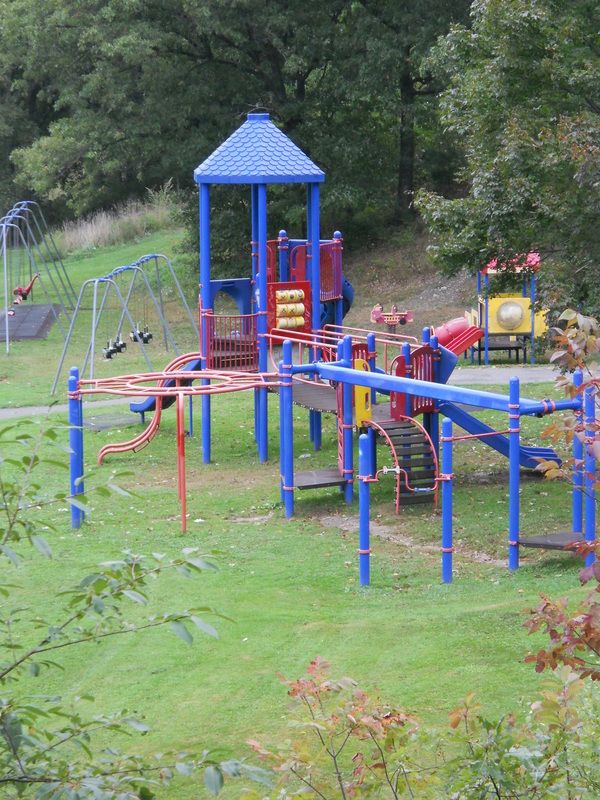
Picture Taken using Camera Meter Suggested Exposure Setting
|
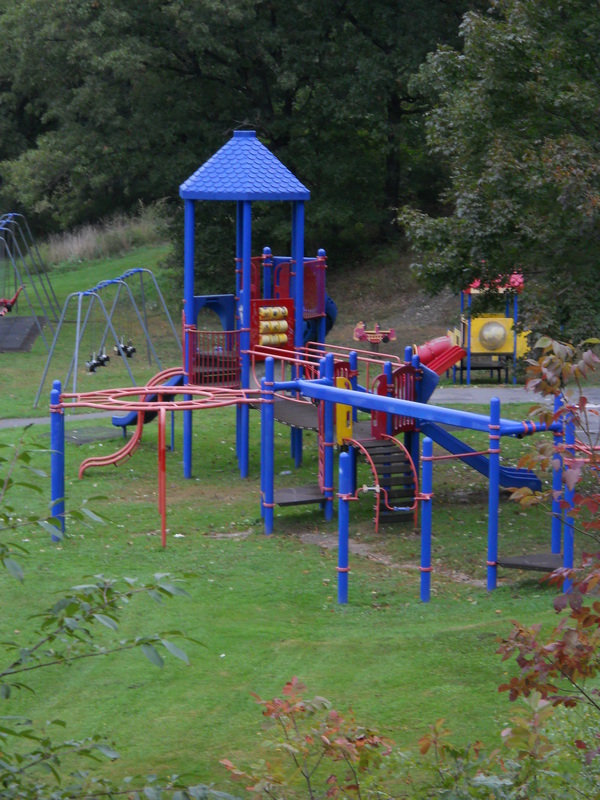
Exposure Compensation Setting EV-1
|
What is Exposure Compensation? The Exposure Compensation feature in digital cameras is a quick and easy way to adjust the camera's Exposure Value (EV) settings. That in turn will cause the camera to take a lighter or darker picture than what is programed as the best exposure. (or whatever settings the photographer is currently using)
The Exposure Value is simply a combination of the shutter speed, the lens aperture setting, and ISO settings that are being used for a shot.
Read the tutorial Camera Exposure Basics for more on ISO, Shutter Speeds, and Aperture settings. (Knowing how those camera functions work can be useful when it comes to understanding what is happening when you use your camera's exposure compensation feature).
An Exposure Compensation setting of EV+1 will allow more light into the camera during the exposure, which will make the image lighter. An Exposure Compensation setting of EV-1 will decrease the amount of light allowed into the camera during the exposure, and will produce a darker image.
The pictures above are examples of how using the EV+/- feature can affect the overall look (brightness or darkness) of your images.
Using the Exposure Compensation Feature: There is usually an EV+/- button and/or dial on the camera body for adjusting the exposure compensation. Check your camera's instruction manual to locate the exposure compensation controls if necessary.
Once you have located and activated the exposure compensation function, you will see the available settings on your camera's LCD screen. The settings will be shown in a format similar to the numbers below.
-2 . . -1 . . 0 . . +1 . . +2
Those numbers represent full steps for exposure compensation but you wont always need to make full step adjustments. The dots in between the full numbers represent 1/3 increments for adjusting the exposure compensation settings.
Most Basic Compact Cameras like the Sony DSCW830 will usually have maximum EV+/- settings of EV+2 and EV-2. Some Digital SLR cameras like the Nikon D3500 have EV+/- settings up to EV+5 and EV-5. However, you will rarely need to use an exposure compensation setting greater than EV+2 or EV-2.
The most important thing to remember when using the exposure compensation feature is that any EV+ change is a positive adjustment to an image and will make it lighter. Any EV- change is a negative adjustment and will make the image darker.
The images below show another example of when you might want to use your Exposure Compensation EV+/- feature. The image on the left was taken using the camera's suggested aperture and shutter speed. It seemed a little too light. (overexposed) So the camera was set to EV-1 for the image on the right, to make the image a little darker.
Don't forget that you can also use any increments between EV+2 and EV-2 to get the effect you want. EV-1 was used in this example just to keep it simple.

Picture taken using camera's suggested exposure vaules
|

Picture taken using Exposure Compensation setting EV-1
|
How Are Exposure Settings Affected by the Exposure Compensation Feature? Well, it depends.
When used in the automatic mode, the camera may adjust either of the the lens aperture, the shutter speed or the ISO setting. Or it may adjust any two, or all three of those settings to make the image lighter or darker. It will depend on which settings the camera is programmed to use for increasing or decreasing the light entering the camera from the scene.
If you are using a camera that has semi-automatic settings ("P" Program Mode, Aperture Priority, or Shutter Priority Modes), the exposure settings will be adjusted as follows.
The exposure compensation feature does not work in your cameras Manual Mode since that mode is designed for the photographer to control all the settings.
When used in the automatic mode, the camera may adjust either of the the lens aperture, the shutter speed or the ISO setting. Or it may adjust any two, or all three of those settings to make the image lighter or darker. It will depend on which settings the camera is programmed to use for increasing or decreasing the light entering the camera from the scene.
If you are using a camera that has semi-automatic settings ("P" Program Mode, Aperture Priority, or Shutter Priority Modes), the exposure settings will be adjusted as follows.
- When the "P" mode is set, the camera will adjust either the aperture setting, the shutter speed setting, or both to lighten or darken the image. The ISO will remain the same but can be manually changed by the photographer.
- When the Aperture Priority mode is used, the lens aperture will remain at the setting chosen by the photographer and the camera will change the shutter speed to lighten or darken the image. The ISO setting will not change unless the photographer changes it.
- When the Shutter Priority Mode is used, the shutter speed that the photographer has set will remain constant. The camera will adjust the lens aperture setting to lighten or darken the image. Once again, the ISO will not be changed unless the photographer changes it.
The exposure compensation feature does not work in your cameras Manual Mode since that mode is designed for the photographer to control all the settings.
Bracketing Exposures: Changing the Exposure Values for different shots of the same subject is called "Bracketing" This technique can be useful in situations where the lighting is tricky and you are not sure which exposure setting will give you the best final image.
So, many photographers will take a few shots of the same subject "just in case". Usually, bracketing involves taking one shot at the suggested exposure, then one lighter and one darker than the camera's suggested exposure settings.
This is more easily accomplished by using the Exposure Compensation EV+/- feature than by making manual adjustments to the camera's shutter speed and aperture settings.
So in closing, always remember that using the exposure compensation feature is often the best way to make quick and simple adjustments to the light in the pictures you are taking.